
Sunday, 3 March 2013
Update
Quick Update! First of all, the times at the bottom of the posts are wrong. I don't know how to fix them. Second of all, I'm working on a special article on Mezzed It that involves various writers. It's very cool and will take a while. The rest, for now, is a mystery...

HAMSTERS!!!
Mezzing Up Hamster Care
Caring for a hamster is educational, slightly therapeutic and really fun. I know because I have one in my bedroom.

Caring for a hamster is educational, slightly therapeutic and really fun. I know because I have one in my bedroom.
This cheeky, red-eyed chap is Harley. He is a winter white dwarf hamster but his colouring is different. Unlike others, he is cream with a beige stripe. I still can't believe he's already 10 months old!
Anyways, here is a guide to caring for a hamster. Its very fun so it simply HAD to be Mezzed Up.
HOW TO CARE FOR A HAMSTER
Step 1) Buy the hamster. You will need to buy a cage, bedding, food, sawdust, a hamster ball and some hamster treats to train it. Most cages come with a water bottle, wheel, a food bowl and bedroom for the hamster. Buy the hamster and the kit at the same time unless you already know what type of hamster you want.
Step 2) Take the hamster home and prepare the cage with sawdust, a ready made bed, water and food before letting the hamster out of the travel box. Put the box in a ventilated, not too warm and not too cold room.
Step 3) Cuddle the hamster everyday for up to 20 minutes at a time. Let the hamster settle in though and give it a lot of alone time. BUT DON'T FORGET TO FEED IT, GIVE IT WATER AND GIVE IT PLENTY OF ATTENTION to get it used to humans. Every time you cuddle it, put a treat in front of it/ next to it's bedroom so that it will trust you and recognise good behaviour and bad behaviour. By doing all of this, the hamster will become tame, confident and friendly.
If it nips you, put it back in it's cage. If it does a wee on you, that's normal. Just put it back and change clothes. IT WILL POO IN YOU. Just put it in a tissue and bin it. Hamster poo doesn't stink unless the hamster is a bit poorly or has diarrhoea.
Step 4) After a few weeks, your hamster should be tame. You can now spend quality time with it. Personally, I like sitting on the sofa with mine and watching TV.

TIPS
Thank you for reading! Don't forget to comment. XD
Mez Out.
|
|
CRY FOR COMMENTS!!!
CRY FOR COMMENTS!!!
Hi readers!
On the blog overview, I've noticed that I've been getting more and more views. THANK YOU READERS! But as you may notice, I've received no comments. :(
So please leave a comment on one or two of my posts. It took 4 days to Mez Up Google+ and I worked really hard on it after I'd done my homework so you can imagine I was disappointed when it got no comments.
Anyway, thank you very much for reading Mezzed It, I hope you enjoyed it and will keep reading. :)
Love from Mez. x
PS: Here are the stats.

Hi readers!
On the blog overview, I've noticed that I've been getting more and more views. THANK YOU READERS! But as you may notice, I've received no comments. :(
So please leave a comment on one or two of my posts. It took 4 days to Mez Up Google+ and I worked really hard on it after I'd done my homework so you can imagine I was disappointed when it got no comments.
Anyway, thank you very much for reading Mezzed It, I hope you enjoyed it and will keep reading. :)
Love from Mez. x
PS: Here are the stats.

Saturday, 2 March 2013
Mezzing Up Google+... this one's complicated.
So What Am I On About?
Have you ever heard of Google Sites? Well the latest thing I've Mezzed Up Google+ and how to make a personalised space with the Sites section. You can also use Google sites for any sort of website. To blog, to vlog, or even to promote you YouTube channel!So here's how to make one. You will need a laptop, internet access and a Google account.
HOW TO MAKE A PERSONALISED SPACE ONLINE
Step 1) Log onto Google and go into More and then down to Even More.

Step 2) Now go down to Sites. and click on it. Sometimes it comes up with a different page for Even More. I don't know why. :/
Step 3) Next click on CREATE and fill in the options. You CAN give the website different title than the URL.


Step 4) Once you have your website, use the edit button to edit the Homepage with a personalised message to yourself such as "Welcome back to Your Place!"
These are the buttons that you will need to know about. They'll come in later.

Step 5) Click the New page button and make a the first page. Anything you like. Add text and html codes.
Step 6) This next part is a bit more complicated. :/
Go into Share. This page should come up.
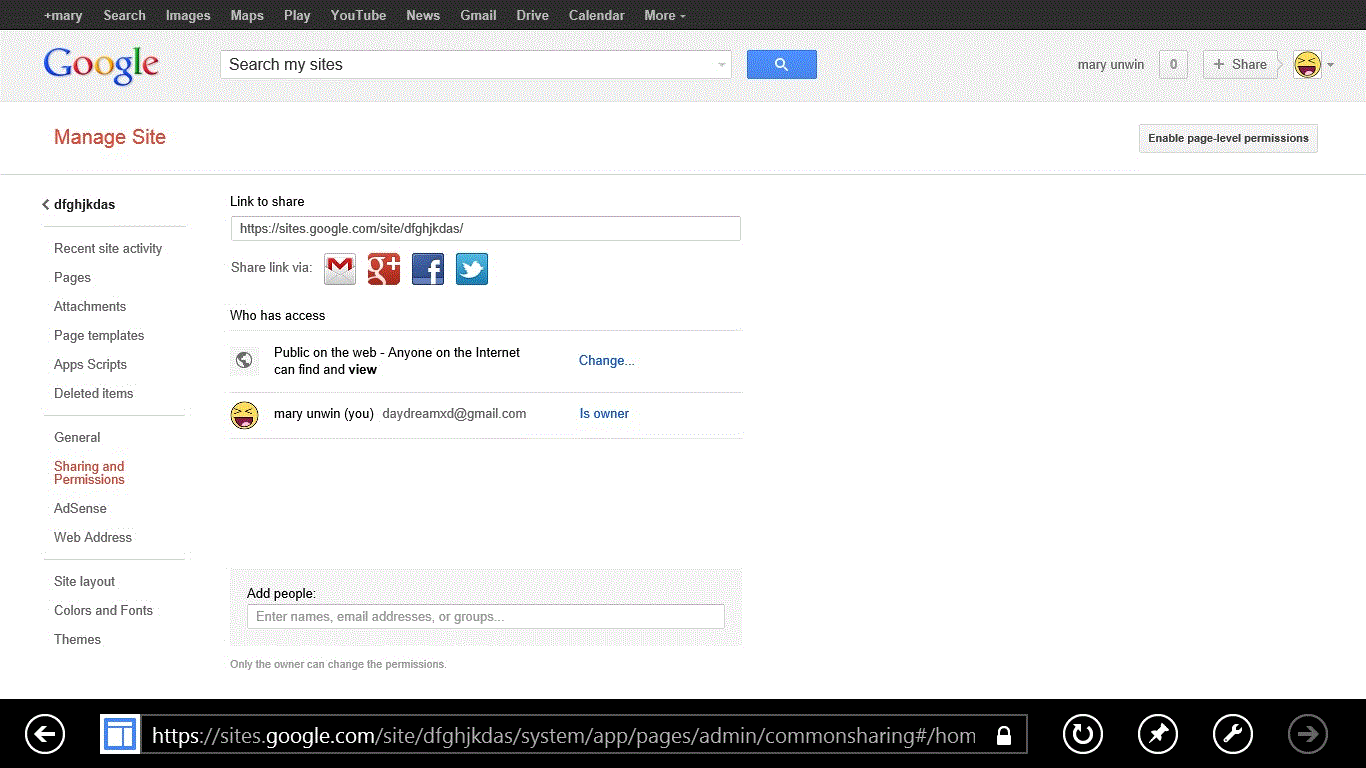


Now click on Change in Who Can Access. This should let you change it to Private so that only you can see it.
Step 7) Go back to your website with the button on the left with the arrow and the website's title. You can now make new pages and add stuff to your website.
Make a video page, a music page, a page with links to your favourite websites and a page full of your favourite images. See EXTRA for help.
Just to be helpful, here's an example. It's not so personal or got much stuff in but that's because it's for you to see and I don't want to show you my personal stuff.
EXTRA:
How to change the background: Go into More and down to Manage Site. Now go to Colours and Fonts on the left and click on either Page Background Colour or Page Background Image to choose a colour or an image.
How to embed a video into the website: First go onto YouTube or Vimeo and find the video you would like to embed. Have this in a separate tab to the website. Then right click on the video and click on Copy Embed Code. Go back into your website, click edit page on the page you want and then click on HTML at the top. Once that's up, make sure you're in the typing box and click enter to get on a new line. Now right click and click paste to get the embed code into the HTML. Click enter again and then click UPDATE.
Go to this link for other things you can put into the website. These are HTML codes which you put into the HTML box to add special features to your website such as games, special effects and moving icons.
Sunday, 24 February 2013
Another Use for Beads
Mezzed Up - Cheap Beads
I made a lovely bookmark out of card, thread and cheap plastic beads. Do you like it?
I made a lovely bookmark out of card, thread and cheap plastic beads. Do you like it?
 |
| The writing says "Friendship is like a flower. If not nurtured, it withers and dies. If nurtured, it grows, gets stronger and is beautiful. Nurtured is spelt wrong. :- / |
You like it? I know it's not very clear. The focus of the bookmark is the flower made of beads on the top. There is also a plait at the back. Do you want to make it? Here's what I did.
Step 1) First of all you measure some thread to about 80cm. Then you put a gold/yellow/orange/amber/brown bead in the middle (approximately) and tie it with one knot.
Step 2) Next you put 5 beads of one colour on one side, put them in a loop and tie it in a double knot to secure it. You now have a petal. Then repeat this with another colour bead but once you've finished THAT petal, tie the thread coming off the petal to the gold bead so that the flower will keep fastened.
Step 3) Repeat this AGAIN with another colour bead and tie it to the gold bead too.
Step 4) You are now left with a pretty, 3-petal flower with 2 long lengths of thread on either end. This is the fun bit! You now need your card. Turn it landscape and use scissors to cut 6cm of card off of the width of the card.
Step 5) Use a hole punch (I used a shaped hole-punch but you don't have to) to punch a hole in the top middle of the bookmark. Now use 1 of the lengths of thread dangling off the flower to tie it to the bookmark through the hole. Now you can decorate the rest of the bookmark as you wish with a personalized message.
Step 6) You could just cut off the remaining thread and be done OR you could get another piece of thread about 25cm long and tie it at one end to the hole. Pull all three pieces of thread round to the back of the bookmark, secure it and plait the thread. SIMPLE!!! XD
I invented these bead flowers myself. What do you think? Have I properly Mezzed Up Beads? And what should I Mez Up next??? Leave me a comment.
BEADS, YOU ARE ON THE MEZZED LIST!
Mez out. XD
PS: If you want to use the metallic beads I used for my bookmark, you can buy them at Hobbycraft in the plastic beads section very cheap.
Hi I'm Mez
Mezzing it Up
Hiya! I'm Mez and this is my blog. Here on Mezzed It I'm going to find something and Mez it up! That means covering it on Mezzed It. I cover fun things to do or make that will make you happy. If you have a request of something I could Mez Up, leave me a comment! In the meantime, I'll be finding something of my own to Mez Up.Mez Out! XD
Subscribe to:
Posts (Atom)